If you own a JDM import, Vitz, Aqua, Prius, Fit, Vezel, anything Japanese, and you’re tired of tiny speedometers or dashboard designs from 2005, this guide about HUD for JDM cars in Pakistan is for you.
We’re talking plug-and-play heads-up displays: what they are, how they work, why they’re perfect for Japanese imports, and exactly how to install one without visiting a mechanic.
Let’s make your daily driver feel like a spaceship.
What Exactly is a Heads-Up Display (HUD)?
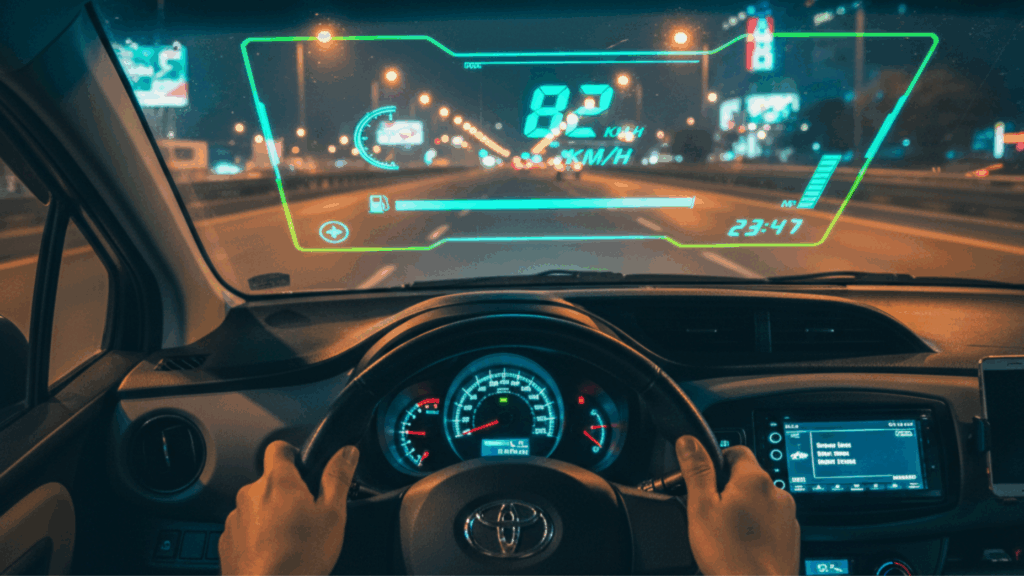
A heads-up display projects important driving information onto your windshield (or a clear screen positioned near it) so you can see your speed, RPM, fuel level, and other data without looking down at the dashboard.
The term “heads-up” comes from aviation. Fighter pilots needed to see critical flight data without looking down at instruments, so engineers developed transparent displays that projected information directly in their line of sight.
Same concept, just for cars now.
In a car, a HUD shows you:
- Current speed
- Engine RPM
- Fuel consumption
- Water temperature
- Voltage
- Trip distance
- Driving time
- Gear position (in some models)
- Warning alerts (check engine, low fuel, etc.)
All of this floats in front of you, slightly above your steering wheel, so you’re basically looking through the data at the road ahead. You don’t have to shift your eyes down to the dashboard.
Sounds fancy and expensive, right? Like something only in the BMW 5 Series or the Mercedes C-Class?
Not anymore. Plug-and-play aftermarket HUDs cost Rs. 5,000-15,000 and work with almost any car made after 2008 that has an OBD2 port (which is pretty much every JDM import).
Why JDM Imports Need HUDs More Than Other Cars
Japanese Domestic Market cars are amazing. Fuel efficient, reliable, affordable and easy to maintain. There’s a reason half of Pakistan drives Vitz, Aqua, Prius, and Fit models.
But JDM cars have one consistent problem: tiny, outdated dashboard displays.
Let me explain.
JDM cars are designed for the Japanese market, where:
- Roads are smooth, and speed limits are strictly followed
- Drivers don’t need massive, in-your-face speedometers
- Dashboard space is minimized to maximize interior comfort
- Digital displays are small because Japanese buyers prefer a minimalist design
This works great in Tokyo. Not so great on Shahrah-e-Faisal, where you’re dodging rickshaws, checking your speed, watching for speed bumps, and trying not to hit that random pothole disguised as a puddle.
Types of Aftermarket HUDs Available in Pakistan
Not all HUDs are created equal. There are three main types you’ll find in Pakistan:
1. OBD2 Plug-and-Play HUDs (The Best Option)
These plug directly into your car’s OBD2 diagnostic port (that 16-pin connector under your steering wheel). They pull data straight from your car’s computer.
How they work:
- Plug the cable into the OBD2 port
- The HUD unit powers on automatically when you start the car
- Data is pulled from your engine control unit (ECU)
- Information is projected onto the windshield or a transparent screen
Pros:
- Super easy installation (literally plug and play)
- No wiring, no splicing, no technical skills needed
- Works with almost any car made after 2008
- Shows accurate, real-time data directly from your ECU
- Can display engine diagnostics and error codes
- Powers on/off automatically with the car
Cons:
- Slightly more expensive (Rs. 6,000-15,000)
- Requires an OBD2 port (very rare to find a JDM car without one)
Best for: Anyone who wants easy installation and accurate data. This is what I recommend for 95% of people.
2. GPS-Based HUDs
These use GPS satellites to calculate your speed, not your car’s computer.
How they work:
- Built-in GPS receiver tracks your position
- Calculates speed based on GPS data
- Projects speed onto the windshield or screen
- Usually includes compass direction and altitude
Pros:
- Works with literally any car (doesn’t need OBD2)
- Can show GPS-based data like altitude and direction
- Portable; move it between cars easily
Cons:
- Less accurate than OBD2 (GPS can lag or lose signal in tunnels/underpasses)
- Can’t show RPM, fuel consumption, or engine data
- Needs a clear view of the sky for the GPS signal
- Battery-powered models need charging
Best for: Older cars without OBD2 ports, or people who want to move the HUD between multiple vehicles.
3. Wired HUDs (The Old-School Option)
These hardwire into your car’s electrical system, usually connecting to the speedometer cable or speed sensor.
How they work:
- Wires connect to the speed sensor, ignition, and ground
- Data is pulled from the speed sensor signal
- Projects onto the screen
Pros:
- Can work with very old cars
- Sometimes cheaper than OBD2 versions
Cons:
- Installation is complicated; it requires cutting wires and electrical knowledge.
- Risk of damaging your car’s wiring
- Usually, it only shows speed, nothing else
- Needs professional installation (Rs. 2,000-5,000 extra)
Best for: Nobody, honestly. Unless you have a 1995 Corolla without an OBD-II port, skip this option.
My recommendation: Go with an OBD2 plug-and-play HUD. They’re easy to install, work perfectly with JDM imports, and give you way more data than GPS or wired options.
What to Look for When Buying a HUD for JDM car in Pakistan
Walking into a car accessory shop or browsing Daraz for HUDs can be overwhelming. There are dozens of models, all claiming to be the best.
Here’s what actually matters:
Display Size and Clarity
HUD screens range from 3 inches to 6 inches. Bigger isn’t always better; you don’t want it blocking your view.
Sweet spot: 4-5-inch display. Large enough to read easily, small enough not to obstruct your vision.
Resolution matters too. Cheap HUDs have pixelated, blurry displays. Good ones have crisp, clear fonts you can read in direct sunlight.
Look for models with adjustable brightness (auto-dimming is even better). You need it dim at night and bright during the day.
Windshield Projection vs Reflective Film
Some HUDs project directly onto your windshield. Others come with a clear reflective film or plastic screen that you place on the dashboard.
Direct windshield projection:
- Looks cooler (true fighter jet vibes)
- Cleaner dashboard appearance
- It can be hard to see in bright sunlight, depending on the windshield angle
- Might have double-image issues with some windshields
Reflective film/screen:
- Always visible regardless of lighting
- No double image problems
- Takes up dashboard space
- Slightly less cool-looking
Both work fine. If your windshield is steeply angled or heavily tinted, go with the reflective film version.
Data Display Options
What information do you actually want to see?
Minimum useful data:
- Speed (obviously)
- RPM
- Water temperature
- Voltage
Nice-to-have data:
- Fuel consumption (instant and average)
- Trip distance
- Driving time
- Gear position
- Compass direction
Advanced features:
- Error code reading (check engine light diagnostics)
- Speed alarms (beeps when you exceed the set limit)
- Shift lights (for manual transmissions)
- 0-100 km/h timer (for the enthusiasts)
Choose based on what you’ll actually use. Don’t pay extra for 20 display modes if you’ll only ever look at speed and RPM.
Build Quality
Cheap HUDs use flimsy plastic and have loose buttons that break after three months. Quality units have solid construction and proper materials.
Check for:
- Sturdy plastic housing (not thin, flexible plastic)
- Secure OBD2 connector (cheap ones wiggle loose)
- Quality cable with proper insulation
- Anti-slip base pad
- Proper packaging (not just bubble wrap in a ziplock bag)
Red flags:
- No brand name or logo
- “Made in China” is fine, but “Made in Chainaa” is not
- Suspiciously cheap (Rs. 2,000 HUDs are usually garbage)
- Product photos that look Photoshopped
- No manual or instructions included
Compatibility
Most OBD2 HUDs work with all cars that have OBD2 ports. But some don’t play nice with certain brands or models.
JDM cars (Toyota, Honda, Nissan): Usually work with everything. OBD2 standards are well-established.
Korean cars (Hyundai, Kia): Also good compatibility.
Chinese EVs (BYD, MG): Hit or miss. Some use non-standard OBD2 protocols.
If you’re buying from AutoStore or a reputable seller, ask if it works with your specific car model. Most sellers know which HUDs work with which cars.
Price Range
In Pakistan, you’ll find HUDs across a wide price range:
Rs. 2,500-4,000: Cheap Chinese units. Basic display, often GPS-based, questionable quality. It might work for a few months.
Rs. 5,000-8,000: Decent OBD2 HUDs with basic features. Good enough for most people. This is the sweet spot for value.
Rs. 9,000-15,000: Premium units with larger displays, more features, better build quality. Worth it if you want the best experience.
Rs. 15,000+: High-end models with color displays, advanced diagnostics, smartphone connectivity; Overkill for most people, but very cool.
For a reliable HUD that works well with JDM imports, budget Rs. 6,000-10,000. You’ll get a good quality unit that lasts.
Step-by-Step Installation Guide (The Easy Way)
Right. You bought a HUD. Now let’s install it.
You don’t need tools, technical knowledge, or a mechanic. If you can plug in a phone charger, you can install a HUD.
What You’ll Need
- Your HUD unit (obviously)
- The included OBD2 cable
- The display unit
- The anti-slip mat or adhesive pad (usually included)
- A microfiber cloth
- Maybe some zip ties for cable management (optional)
That’s it. No tools required.
Step 1: Locate Your OBD2 Port
Every car made after 2008 has an OBD2 diagnostic port. It’s a 16-pin connector that mechanics use to read error codes and diagnose problems.
Where to find it:
In 90% of cars, the OBD2 port is under the steering wheel, near the pedals. Get down on the floor and look up under the dashboard.
Common locations:
- Right of the steering column, near the fuse box
- Center console area near your knee
- Behind a small plastic cover (pop it off if you see one)
In JDM imports specifically:
- Toyota Vitz/Aqua/Prius: Left side, up under the dash near the hood release
- Honda Fit/Vezel: Left side, higher up near the steering column
- Nissan Note/Dayz: Center area behind a small cover
- Suzuki Swift/Wagon R: Left side, sometimes behind a cover
It’s a trapezoid-shaped connector with two rows of pins. Can’t miss it once you find it.
If you’re really struggling, Google “[your car model] OBD2 port location” and you’ll find photos.
Step 2: Connect the OBD2 Cable
Once you’ve found the port, plug in the OBD2 cable from your HUD unit.
How to do it properly:
- Line up the connector; it only goes in one way
- Push firmly until you feel it click into place
- Give it a gentle tug to make sure it’s seated properly
- Don’t force it; if it’s not going in, you’re probably holding it upside down
Some OBD2 ports are recessed deep in the dashboard. You might need to push through some plastic clips or squeeze past some wires. This is normal. Be patient.
The cable should stay connected firmly. If it keeps falling out, the connector might be loose (a sign of a cheap HUD; this is why quality matters).
Step 3: Route the Cable to Your Dashboard
The OBD2 cable is usually 1.5-2 meters long. You need to route it from under the steering wheel up to wherever you’re placing the display unit.
Clean routing method:
- Run the cable along the left side of the steering column
- Tuck it under the dashboard edge
- Bring it up near the windshield where your display will sit
- Use zip ties or cable clips to secure it neatly (optional but recommended)
Lazy method:
- Just drape the cable wherever it reaches
- It’ll work, but it looks messy
- You’ll probably kick it with your foot occasionally
I recommend the clean method. Takes an extra 3 minutes and looks way better. Autostore.pk sells cable management clips in their mobile accessories section if you want to do it properly.
Step 4: Position the Display Unit
Now you need to decide where to put the actual display.
Best placement options:
Option A: On the dashboard, near the windshield
- Most common placement
- Easy to see
- Uses the included anti-slip mat
Place it slightly left of center, in line with your steering wheel. You want it high enough that you barely need to move your eyes down from the road.
Option B: On the dashboard, center position
- Works for cars with center-mounted factory speedometers
- More symmetric look
- It might be harder to see with the sunlight glare
Option C: Near the gauge cluster
- Some people place it in front of the analog speedometer
- Convenient but might block some gauges
- Only works if you have space there
What NOT to do:
- Don’t place it too far left or right (you’ll have to turn your head)
- Don’t place it too low (defeats the purpose of a HUD)
- Don’t stick it directly to the windshield with adhesive (hard to remove later)
- Don’t block your airbag deployment area
For most JDM cars, placement just left of center on the dashboard works perfectly.
Step 5: Clean and Stick
Before placing the HUD, clean the dashboard area with a microfiber cloth. Remove dust, dirt, and any dashboard polish residue.
Some premium units have adhesive pads instead. Peel off the backing and stick it down. These are semi-permanent but can be removed with some heat and patience.
Pro tip: Don’t use the adhesive pad immediately. Use the anti-slip mat first for a few days to make sure you like the position. Once you’re sure, switch to adhesive for a more permanent mount.
Step 6: Angle Adjustment
Connect the display cable to the unit (if it’s separate). Turn on your car.
The HUD should power on automatically and start displaying data.
What you’re looking for:
- Clear, readable text
- No double images (if projecting on windshield)
- Comfortable viewing angle; you barely move your eyes from the road
- Not too bright, not too dim
Play with the angle for a few minutes. Drive around the block if needed. Get it perfect.
Step 7: Brightness and Settings
Most HUDs have brightness controls, either manual buttons or automatic sensors.
Manual brightness:
- Press the +/- buttons to adjust
- Set it bright enough for daytime visibility
- Dim enough for nighttime comfort
- You’ll need to adjust this seasonally
Auto brightness:
- Has a light sensor that adjusts automatically
- Way more convenient
- Worth paying extra for if available
Other settings to configure:
- Speed unit (km/h vs mph; make sure it’s on km/h for Pakistan)
- Display mode (which data screens to cycle through)
- Warning alarms (speed alerts, over-rev warnings)
- Screen timeout (usually best left on “always on”)
Refer to your manual for specific button combinations. Every HUD is slightly different.
Step 8: Cable Management (Final Touch)
Once everything is working and positioned correctly, tidy up your cables.
Use zip ties or adhesive cable clips to secure the OBD2 cable along the dashboard edge. This prevents it from:
- Dangling near your feet and getting tangled
- Getting pulled out accidentally
- Looking messy
- Rattling against plastic trim
Run it neatly from the OBD2 port along the side of the center console to the display unit. Hide it behind trim pieces if possible.
Professional-looking installation in an extra 5 minutes of effort.
Step 9: Test Drive
Take your car for a drive. Check that:
- Speed readings match your speedometer (they should be identical or within 1-2 km/h)
- RPM displays correctly
- Other data makes sense (fuel consumption, temperature, etc.)
- Display doesn’t vibrate or shake on bumpy roads
- Brightness is appropriate for different lighting conditions
If something seems off, wrong speed readings, flickering display, loose connection, stop and troubleshoot.
Most issues are simple fixes: a loose OBD2 connection, incorrect settings, or an incompatible HUD model.
Do HUDs Work with All JDM Cars?
Short answer: Yes, almost all.
Long answer: If your JDM import has an OBD2 port (standardized in Japan from 2008 onwards), an OBD2 HUD will work.
Confirmed working with:
Toyota:
- Vitz (all models 2010+)
- Aqua (all models)
- Prius (all models)
- Corolla (2008+)
- Fielder (2008+)
- Noah/Voxy (2008+)
- Wish (2009+)
Honda:
- Fit/Jazz (2007+)
- Vezel/HR-V (all models)
- City (2008+)
- Civic (2008+)
- Insight (all models)
Nissan:
- Note (2008+)
- Dayz (all models)
- Serena (2010+)
- X-Trail (2008+)
Suzuki:
- Swift (2010+)
- Wagon R (all JDM models)
- Hustler (all models)
Mazda:
- Demio/Mazda2 (2007+)
- Axela/Mazda3 (2009+)
Mitsubishi:
- RVR/ASX (2010+)
- Lancer (2007+)
Basically, any Japanese car from 2008 onwards should work fine.
Potential compatibility issues:
- Very old JDM imports (pre-2008) might not have OBD2 ports
- Some hybrid systems use non-standard protocols (usually still work but show limited data)
- Rare JDM sports cars might have modified ECUs that don’t communicate properly
If your car has a 16-pin OBD2 port under the steering wheel, a HUD will work. That’s like 99% of JDM imports in Pakistan.
HUD vs Aftermarket Digital Gauge Clusters
Some people consider replacing their entire gauge cluster with an aftermarket digital unit instead of adding a HUD.
Let me break down the comparison:
Aftermarket Gauge Cluster
Pros:
- Replaces your factory gauges with a modern digital display
- Integrated look; no extra devices on dashboard
- It can be very high-quality with huge screens
- Multiple display modes and customization
Cons:
- Expensive (Rs. 30,000-100,000+ for quality units)
- Complex installation; requires removing the factory gauge cluster and wiring.
- Might cause issues with the car’s computer or error codes
- Can affect resale value
- Not reversible without significant work
Best for: People doing major interior upgrades or building custom projects.
What you need to know:
- Don’t mount it where it blocks your view of the road, traffic, or signals
- Don’t place it where it would block airbag deployment
- Keep it reasonably sized and positioned
- If a traffic officer questions it, explain it’s for safety (keeps eyes on the road instead of looking down at the speedometer)
FAQs: HUD for JDM cars in Pakistan
Q: Will a HUD drain my car’s battery when parked?
No. OBD2 HUDs only draw power when the car is on. The moment you turn off the ignition, the HUD powers down completely and draws zero current from your battery. An OBD2 device can’t drain your battery while parked because the OBD2 port itself is only powered when the ignition is on (by design; diagnostic tools need the car’s systems active to read data).
The only exception would be certain GPS tracker HUDs that have their own internal battery for tracking while parked, but even these don’t drain your car’s battery. If your car battery is dying, the HUD is definitely not the culprit.
Q: Can I use the same HUD in multiple cars?
Yes, absolutely. That’s one of the best features of plug-and-play OBD2 HUDs. Unplug it from Car A, plug it into Car B, and it works immediately. I’ve personally moved the same HUD between a Vitz, an Aqua, and a Civic with zero issues. This makes HUDs perfect for households with multiple cars; buy one good unit and move it to whichever car you’re driving that day. Some people keep a HUD in their daily driver and move it to their second car for road trips.
Some premium HUDs even save settings for multiple vehicles in memory, so you don’t have to reconfigure each time; it’s a budget-friendly way to get HUD functionality in all your cars without buying multiple units.
Q: My car already has a factory HUD. Can I still install an aftermarket one?
You can, but why would you?
Factory HUDs in premium cars (some Lexus, BMW and Mercedes models) are usually excellent and display all necessary information. However, if your factory HUD is broken and repair costs Rs. 50,000+, then yes, an aftermarket OBD2 HUD makes perfect sense as a replacement. It won’t integrate as seamlessly as the factory system, but it’ll give you 80% of the functionality at 10% of the repair cost. Also, older factory HUDs (2010-2015 models) often show limited information; just speed, maybe navigation arrows.
If you want additional engine data like RPM, fuel consumption, voltage, and temperature that your factory HUD doesn’t display, an aftermarket unit can complement it nicely. Position it slightly to the side so both displays are visible. Looks a bit cluttered, but gives you all the data. Most people don’t need this, though. If your factory HUD works, use that.
Final Thoughts: Is a HUD Worth It for Your JDM Car?
After installing HUD for JDM cars in Pakistan and living with one daily for over a year, here’s my honest assessment:
You should get a HUD if:
- Your car has a small, hard-to-read speedometer
- Your speedometer is center-mounted (looking at you, Aqua/Prius owners)
- You want to monitor real-time fuel consumption
- You like having engine data at a glance
- You value safety and want to keep your eyes on the road
- You’re a bit of a tech enthusiast
- You want your JDM car to feel more modern
Skip the HUD if:
- Your factory gauges are already huge and easy to read
- You genuinely don’t care about speed/RPM data
- Your dashboard is cluttered with no space for another device
- You’re trying to keep your car completely stock
- Budget is super tight (Rs. 6,000-8,000 might be better spent on maintenance)
For most JDM import owners, especially those with Vitz/Aqua/Prius/Fit models with tiny displays, a HUD is legitimately one of the best value modifications you can make.
It’s cheaper than new seat covers, easier to install than new speakers, more useful than cosmetic chrome products, and way more impressive than fancy key chains.
Rs. 6,000-10,000 for a significantly improved driving experience and safety? That’s good value.
Plus, you get to feel like a fighter pilot every time you drive to get groceries. Worth it for that alone.