If you’ve owned your car for more than three or four years in Pakistan, chances are your headlights have turned from crystal clear to that embarrassing yellow-foggy mess. It happens to everyone. The brutal Pakistani sun, dust storms, pollution, and general road grime team up to destroy your headlight lenses faster than you can say “why is my car failing inspection?”. But, here is some good news: It’s totally possible to opt for headlight restoration in Pakistan all by yourself!
You don’t need to spend Rs. 15,000 to Rs. 40,000 replacing your headlights. You don’t even need to take your car to a workshop and wait three days. With the right products and technique, you can restore your headlights to near-perfect clarity in about 10 minutes per light, spending less than Rs. 2,000 total.
And before you ask – yes, it actually works. We’ve done this hundreds of times at Autostore, and we’ll walk you through exactly how to do it yourself.
Let’s get those headlights looking like new again.
Why Do Headlights Turn Yellow and Foggy Anyway?
Before we jump into the fix and headlight restoration in Pakistan, let’s understand what’s actually happening to your headlights. Because if you understand the problem, the solution makes a lot more sense.
The Science Behind Headlight Oxidation
Modern car headlights aren’t made of glass anymore – they’re made of polycarbonate plastic. This material is chosen because it’s:
- Lightweight
- Impact-resistant (doesn’t shatter like glass)
- Moldable into complex shapes
- Cheaper to manufacture
The problem? Polycarbonate plastic degrades when exposed to UV light from the sun. Your headlight lenses have a protective coating when they leave the factory, but that coating breaks down over time – especially in Pakistan’s harsh climate.
Once that protective layer is gone, the UV rays start attacking the plastic itself, causing:
- Oxidation: The surface becomes rough and cloudy
- Yellowing: The plastic literally changes color
- Micro-cracking: Tiny cracks form on the surface
- Pitting: Small holes and imperfections appear
Add in dirt, road tar, bug residue, and general grime, and you’ve got headlights that look like they’ve been through a sandstorm. If you’re in Pakistan during the summer, they probably have.
The Safety Issue Nobody Talks About
Here’s something that should concern you more than how your car looks: foggy, yellowed headlights can reduce your light output by 50-80%.
That’s not cosmetic – that’s dangerous.
You’re driving at night with essentially half (or less) of your intended illumination. Your stopping distance increases. Your ability to see pedestrians, cyclists, and other hazards decreases dramatically. You’re putting yourself and others at risk.
And if you think your high beams compensate, they don’t. Dirty, oxidized lenses scatter light rather than focus it. You end up blinding oncoming traffic while barely seeing the road yourself.
Headlight restoration in Pakistan isn’t optional maintenance – it’s a safety necessity.
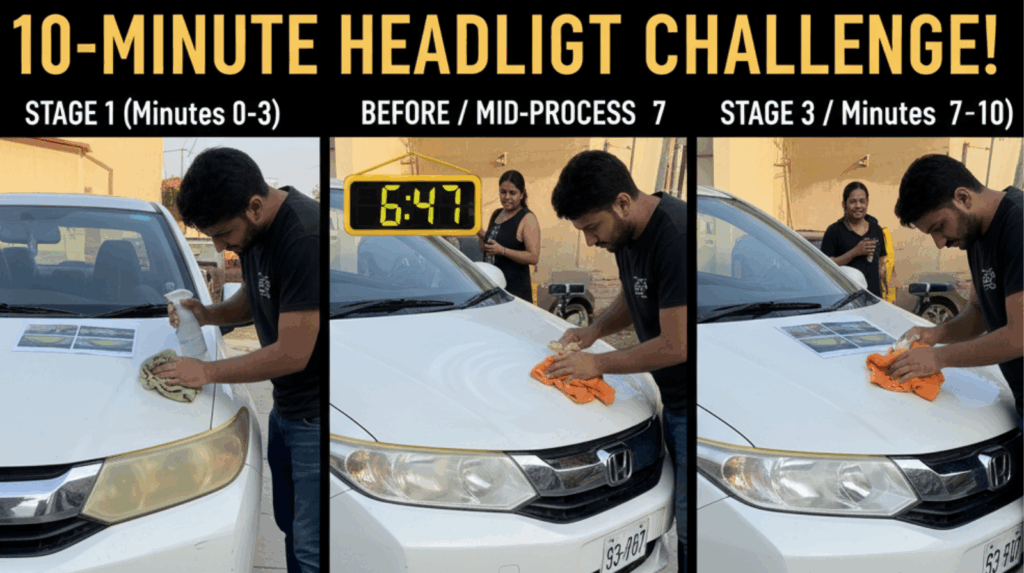
The Complete 10-Minute Headlight Restoration Process in Pakistan
Alright, enough theory. Let’s get your headlights looking new again. We’re breaking this down step by step so clearly that even if you’ve never done any car maintenance before, you’ll nail it.
Step 1: Park in the shade
This is crucial. Never try to do headlight restoration in direct sunlight. The products will dry too quickly; you won’t be able to see what you’re doing properly, and the heat makes everything harder.
Park under a tree, in your garage, or wait until evening. Your future self will thank you.
Step 2: Wash your headlights
Use car wash shampoo and water to remove all surface dirt and grime. You don’t want to be rubbing dirt into your lenses during the restoration process.
Dry completely with a microfiber towel.
Step 3: Tape off the surrounding area
Use masking tape to protect the paint around your headlights. The sandpaper and compounds we’re about to use can damage your car’s paint if you’re not careful.
Tape about 1-2 inches around the entire headlight assembly. Take your time with this – it’s worth the extra minute.
Step 4: Set up your supplies
Lay everything out within reach:
- Bucket of clean water
- Sandpaper sheets
- Compounds and polishes
- Towels and applicators
- Spray bottle with water
Having everything organized means you won’t have to search for things mid-process.
Stage 1: Sanding Away the Oxidation (3-4 minutes per headlight)
This is where the magic happens. We’re going to remove that yellowed, oxidized layer to reveal the clear plastic underneath.
Important: This part scares people, but trust the process. Yes, you’re literally sanding your headlights.
Step 1: Start with 1500 grit (if heavily oxidized)
If your headlights are severely yellowed:
- Wet your 1500-grit sandpaper and the headlight with water
- Using light to medium pressure, sand in straight horizontal lines
- Keep both the sandpaper and the headlight wet at all times
- Sand for 1-2 minutes
- The headlight will look terrible – cloudy and scratched. This is correct.
If your headlights are only mildly yellowed, skip this step and start with 2000-grit.
Step 2: Move to 2000 grit
- Rinse the headlight and wipe it clean
- Wet your 2000-grit sandpaper
- This time, sand in vertical lines (opposite direction from before)
- Sand for 1-2 minutes with light pressure
- Keep everything wet
- The cloudiness will start to even out
Step 3: Finish with 3000 grit
- Rinse and wipe again
- Wet your 3000-grit sandpaper
- Sand in horizontal lines again (alternating direction helps)
- Sand for 1-2 minutes
- The headlight should look uniformly cloudy/frosted, with no yellow visible
- Keep it wet throughout
Pro tip: If you spray car wash soap into your water, it acts as a lubricant, making sanding easier and reducing the risk of scratching.
Stage 2: Polishing to Clarity (3-4 minutes per headlight)
This is the satisfying part where your headlight transforms from a cloudy mess to crystal clear.
Step 1: Apply headlight restoration compound
- Put a small amount of compound on your applicator pad (about the size of a 5-rupee coin)
- Working in small circular motions, apply the compound to the entire headlight.
- Use firm pressure – you’re essentially polishing the plastic
- Work in overlapping circles, covering every inch
- Continue for 2-3 minutes
You’ll start to see the cloudiness disappearing as you work. The plastic will become clearer and clearer with each pass.
Step 2: Buff away the compound
- The headlight should now be significantly clearer
- If there are still cloudy spots, apply more compound and polish again
- Keep buffing until the headlight is clear and all compound is removed
At this point, your headlight should look dramatically better – probably 80-90% clear compared to where you started.
Step 3: Final polish (optional but recommended)
For that extra clarity and shine:
- Apply a small amount of quality car polish
- Polish with a clean applicator pad using circular motions
- Buff with a clean microfiber towel
- This removes any remaining haze and adds extra shine
Stage 3: Protection is Everything (2 minutes per headlight)
Here’s what separates a job that lasts six months from one that lasts two weeks: protection.
You’ve just removed the factory protective coating along with all the oxidation. If you don’t seal the plastic, it will start yellowing again within weeks – even faster than before because there’s no protection at all.
Common Mistakes That Ruin Everything
Let’s talk about the mistakes we see people make when attempting DIY headlight restoration. Learn from others’ failures so you don’t repeat them.
Mistake #1: Sanding Dry
Never, ever sand your headlights dry. Wet sanding is called “wet” for a reason. Without water:
- You generate too much heat from friction
- The sandpaper clogs immediately
- You create deep scratches that are impossible to polish out
- You can actually melt the plastic in spots
Always keep everything wet. If the sandpaper feels like it’s dragging or getting hot, add more water.
Mistake #2: Using Too Coarse Sandpaper
Some people think “rougher is faster” and start with 800- or 1000-grit sandpaper. This creates deep scratches that are extremely difficult to polish out.
Stick to 1500 grit at the coarsest (and only if headlights are severely damaged). For most jobs, starting with 2000 grit works perfectly.
Mistake #3: Not Finishing with Fine Enough Grit
Going up to only 2000 grit and calling it done leaves too much texture. You need to finish with 3000 grit (or even finer) for a surface that polishes to perfect clarity.
Each progressively finer grit removes the scratches from the previous grit. Skip steps, and you’ll see those scratches in the final result.
Mistake #4: Not Protecting After Restoration
This is the biggest mistake. People spend time restoring their headlights, only to not apply any protection. Within 2-4 weeks, the headlights start yellowing again.
The plastic is now completely unprotected – you’ve removed even the factory coating. Without sealant, oxidation happens faster than ever.
Always, always, always apply protection. It’s not optional.
Mistake #5: Working in Direct Sunlight
Trying to do this in full sun means:
- Products dry too quickly
- You can’t see what you’re doing properly
- The plastic gets too hot
- Sealants don’t cure properly
Work in shade or wait until evening. This isn’t a job to rush during lunch hour in summer heat.
How Long Will Your Restoration Last?
The question everyone asks: “How long before I have to do this again?”
The answer depends entirely on your protection method:
With Basic Protection (Wax):
- Duration: 4-8 weeks
- Maintenance: Reapply wax monthly
- Effort: Low initial effort, high ongoing maintenance
This is the “budget” approach. Your headlights will stay clear, but you’ll need to wax them regularly.
Signs It’s Time to Re-Do:
Watch for:
- Light yellowing returning at the top of the headlight (where the sun hits most)
- Water no longer beading off the surface (protection is wearing off)
- Slight haze developing
- Reduced brightness at night
Don’t wait until they’re completely yellow again. Touch up the protection before oxidation gets aggressive.
Advanced Tips from Professional Detailers
Want professional-level results? Here are the insider tricks we use at Autostore when doing headlight restoration on customer cars.
Tip #1: The Crosshatch Sanding Pattern
Instead of just sanding back and forth:
- First pass: Horizontal lines
- Second pass: Vertical lines
- Third pass: 45-degree angle one way
- Fourth pass: 45-degree angle the other way
Tip #2: The Light Test
During polishing, periodically:
- Turn on your headlights
- Look at the beam pattern and clarity
- This shows you exactly where cloudiness remains
- Focus extra polishing on those areas
You’ll see exactly where you need more work, rather than guessing.
Tip #3: The Tape Trick for Perfect Edges
When taping off:
- Apply tape 2mm ONTO the headlight lens around the edges
- This ensures your sanding doesn’t catch on paint
- Creates a perfectly defined edge
Tip #4: Pre-Treat Heavy Oxidation
For severely yellowed headlights:
- Apply a dedicated oxidation remover first
- Let it sit for 5-10 minutes
- This breaks down surface oxidation chemically
- Then proceed with sanding
- Reduces the amount of sanding needed
Products like 3M or Meguiar’s oxidation removers work great for this.
Tip #5: The Ice Water Finishing Touch
After final polishing:
- Spray headlights with ice-cold water
- This causes the plastic to contract slightly
- Closing micro-pores and enhancing clarity
- Old detailer’s trick that actually works
When DIY Isn’t Enough: Knowing Your Limits
Let’s be real – sometimes DIY headlight restoration isn’t the right answer. Here’s when you should consider alternatives:
Your Headlights Are Beyond Restoration If:
1. Internal Fogging/Condensation
- Water is getting inside the housing
- Indicates failed seals
- Restoration won’t help
- The assembly needs to be resealed or replaced
2. Melted or Warped Plastic
- From excessive heat or impact
- Changes the lens shape
3. Severe Pitting Throughout
- Deep holes and damage across the entire lens
- It would require removing too much material to fix
- Could compromise lens integrity
- Better to replace
When to Get Professional Help:
Consider professional service if:
- Your car has complex headlight assemblies (Mercedes, BMW, Audi)
- Headlights are difficult to access or work on
- You’re not confident in your DIY skills
- The car is extremely high-value
- Your time is worth more than the service cost
Professional headlight restoration service typically costs Rs. 3,000-8,000 in Pakistan, depending on the facility and vehicle.
Headlight restoration in Pakistan: Making It Last
You’ve done the work. Now let’s make sure it stays looking good.
Monthly Maintenance (5 minutes):
Week 1-4:
- Wash headlights with car wash shampoo during regular car wash
- Dry with a microfiber towel
- Inspect for any yellowing or damage
- Check that water still beads on the surface
Quarterly Maintenance (15 minutes):
Every 3 months:
- Clean headlights thoroughly
- Apply a fresh coat of your chosen sealant
- Buff to clarity
- Check edges for any oxidation starting
Annual Deep Care (30 minutes):
Once per year:
- Remove any built-up contamination with a clay bar
- Apply 2-3 fresh coats of protection
- Consider upgrading the protection method if the current one isn’t lasting
- Inspect for any early signs of yellowing
Daily Habits That Help:
Small actions, big impact:
- Park in the shade when possible
- Use a car cover if the car sits for extended periods
- Wash bird droppings off immediately (they’re acidic and etch plastic)
- Don’t use harsh chemicals near headlights
- Avoid automatic car washes (brushes can damage protection)
What NOT to Do During Headlight Restoration in Pakistan?
Avoid these protection-killers:
- Using rough sponges or brushes on headlights
- Applying tire shine or other silicone products (overspray damages lenses)
- Power washing directly at the headlights at close range
- Using household cleaners instead of automotive products
- Letting dust and dirt sit on lenses for extended periods
The Protection Reapplication Schedule:
Set calendar reminders:
- Wax users: Monthly application
- Sealant users: Every 3 months
- Ceramic coating users: Booster spray every 2-3 months
Staying on schedule is the difference between headlights that last two years and ones that yellow again in two months.
FAQs: Headlight Restoration Pakistan
Q: I’ve heard that once you restore headlights, they yellow faster the second time. Is this true, and how can I prevent it?
A: This is partially true, and here’s the science behind it. When you sand and polish your headlights, you’re removing the factory UV-protective coating along with the oxidized layer. The raw polycarbonate plastic underneath is more vulnerable to UV damage than the original factory-coated lens. This is exactly why protection after restoration is not optional – it’s critical. Without proper sealing, your headlights can start yellowing again in as little as 2-4 weeks because the plastic has zero UV protection. To prevent rapid re-yellowing, you must apply a high-quality UV-protective sealant immediately after restoration.
Q: Can I use the same technique on my fog lights and tail lights, or do they require different methods?
A: Great question, and the short answer is yes, you can use similar techniques, but with important modifications depending on which lights you’re restoring. Fog lights: These are usually also polycarbonate plastic and respond perfectly to the same restoration process as headlights. The main difference is that they’re often smaller and easier to work with. Follow the same sanding, polishing, and protection process. Just be careful with integrated fog lights that are part of your bumper assembly – tape off surrounding areas even more carefully since bumper paint can be softer and more easily damaged. Tail lights: Here’s where it gets tricky. Modern tail lights are often made from various plastics (sometimes acrylic rather than polycarbonate) and have distinct characteristics. Red or amber tail lights can lose their color if you sand too aggressively – you might sand right through the color layer. For tail lights, we recommend starting with the gentlest approach. Try a dedicated plastic polish without sanding. If that doesn’t work, use only 3000-grit sandpaper with extremely light pressure.
Q: My headlights have yellowing on the inside of the lens. Can restoration fix this, or do I need to open up the headlight assembly?
A: This is one of the most frustrating situations car owners face, and unfortunately, external restoration won’t fix internal yellowing. Here’s what’s happening and your options. Why internal yellowing occurs: Internal yellowing happens for a few reasons: moisture getting into the sealed headlight assembly (from cracked seals), heat from bulbs degrading the inner surface over the years, or poor-quality plastic used on the inner lens of some assemblies. You’ll know it’s internal if, after thoroughly cleaning the outside, you can still see yellow fog through the lens. Your options: Option 1: Professional disassembly and restoration (Best results) – Take the headlight to a specialist who can carefully open the sealed assembly. They’ll restore both inner and outer surfaces, reseal the assembly properly, and ensure no moisture can re-enter. This typically costs Rs. 5,000-10,000 per headlight in Pakistan. We can recommend specialists if you call us at 0302 2111 406. Option 2: DIY disassembly (For mechanically inclined) – Some headlight assemblies can be carefully opened by heating the sealant (using a heat gun or oven at very low temperature). This is risky – you can crack the lens, melt plastic, or fail to reseal properly, causing condensation issues later.
Final Thoughts: Clear Headlights Are Non-Negotiable
We’ve covered everything from the science of oxidation to professional detailing tricks regarding headlight restoration in Pakistan. Now it’s time actually to do it.
Headlight restoration isn’t just about aesthetics (though that’s a nice bonus). It’s about safety – yours, your passengers’, and everyone else on the road. Foggy, yellowed headlights reduce your visibility and put lives at risk.
The good news? For less than Rs. 2,000 and 30 minutes of your time, you can have headlights that look brand new and perform like new.
One Last Thing…
When you opt for headlight restoration in Pakistan (and we hope you will), take before-and-after photos. Send them to us on WhatsApp at 0302 2111 406 or tag us on social media. We love seeing successful DIY projects, and we feature customer results on our channels.
Your headlights are waiting.
Don’t forget to check out our other car care guides: